In knitting my Pomatomus socks 2-at-a-time using Magic Loop knitting, I've learned how to adapt this DPN pattern to my preferred method. There were two issues to resolve that I thought I'd blog about here, mainly for my own benefit, seeing as I'm rather new to the whole sock knitting experience (I've made only 2 pairs, Jaywalker on DPNs and toe-up Monkeys 2xML. What can I say, I'm a sweater girl!). But, I also thought this might benefit anyone else who decides to knit these socks 2-at-a-time, especially if they're new to it. Experienced 2xML sock knitters need not read further ;-)
There are several people on Ravelry who've knit Pomatomus 2-at-a-time, but there wasn't much "how to" information on the forums -- until recently. Miraculously, someone else ran into the same dilemma as I and posted her question the same day that I was going to post, asking for help. She wanted to know how to transfer stitches when you're between socks. Thankfully, Raveler LiquidPen answered the question, and stitches have since then been flying off my circular needle! Currently, I'm on the 3rd Chart A repeat of the leg, getting ever closer to the heel. Woohoo! I'm really digging how these are turning out, not to mention how much I like the yarn and its colorway (Knit Picks Imagination - Lost Boys).
Here follows the two issues 2xML sock knitting beginners like me will encounter:
Part 1 - YOs on Chart A Rnd12
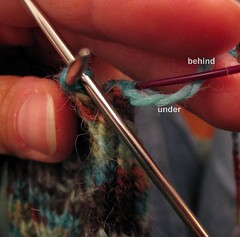
How do you make a YO at the end of each sock? Each sock has 36 sts for the front and 36 sts for the back, which means the end of the 12-st pattern repeat coincides with the end of each sock. So, you'll need to make a total of 4 YOs at the end of each side of each sock on Rnd12. With DPNs, you can work the YO as written. For 2xML, it's a different story... Here's how you do it. You wait until you're at the beginning of the next side, Rnd12Side2 and Rnd13Side1, to do the YOs. Make YOs on the back cable at the beginning of each sock before following the chart for that side. This won't be confusing when you do it because the YOs end up on the back cable, out of sight. Thank goodness, right?! The beginning position of your working yarn is below and between your cables (Pic. 1). Move it under and behind the back cable (Pic. 2), drawing it upward. Now you can begin working the awaiting stitches of that sock. When you get to the next sock, you'll do the same thing, moving the working yarn under and behind the back cable.


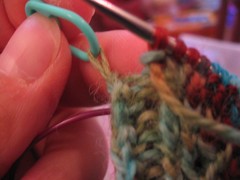
As you can see from the notes written on Pic. 3 (which I only included because of the notes since Pic. 2 is better), you'll need to make YOs at the beginning of each sock on Rnd13Side1. Don't forget! If you do forget, you'll only have 35 sts for each sock on Side 2 and therefore screw up the pattern!
OK, next issue.
Part 2 - Transferring Stitches
Funny that I only have two pictures for this, considering how this issue was my main roadblock. Anyway... The pattern states that you have to transfer the 1st st on each DPN to the end of the previous DPN. Also, when transferring the 1st st of needle 1 to needle 3, you're supposed to use needle 3 to knit the transferred st through the back loop. how does this translate to 2xML? When you get to the first st of the 2nd sock on each side, there's no possible way to follow the directions exactly as written, thanks to the two parallel lines of separated sts. You're between socks and can't access sts from the other side! LiquidPen from Ravelry suggested a way to solve this problem: USE LOCKING STITCH MARKERS.
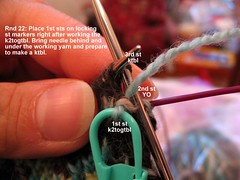
When I finished Chart A for the first time, and therefore was at the rearranging part, I realized when and how to lock the transferred sts. Prepare ahead of time on Rnd22: Work and lock the 1st st of each sock on each side (see Pic. 4), dropping these 4 locked sts off the needle.
Beginning on Rnd22Side2, you'll ktbl the locked sts (from Side1) at the end of each sock (see last pic, Pic. 5). Note: You'll also still be locking sts at the beginning of each sock on that side! Double trouble!
Upon finishing Rnd22, you'll have 2 remaining locked sts to transfer to the next side, which will be Rnd1. If you look at Rnd1 on Chart A, you'll notice that the last st is ktbl; this ktbl represents the remaining two locked sts when doing Side1. This will make sense when you get there because you'll be one st short at the end of each sock, necessitating that you pick up the locked st and ktbl. Once you finish Rnd1Side1, you'll be done transferring sts.
Well, I've been wordy as usual! Regardless, this really helps to journal my experience, and I hope that my pictures and explanations are useful to others. One more thing I wanted to mention: Mary Thomas's Knitting Book (1938). Wow! The knitting predecessor of Elizabeth Zimmermann and Barbara Walker sure is one detailed, thorough lady. When she covers a topic, SHE COVERS A TOPIC. I found the sections on decreases/increases, Western/Eastern and Crossed/Uncrossed (8 sts total; and she mentions Combined Knitting), and Stranding and Weaving very informative. Just imagine, SSK hadn't been invented yet! I found a wealth of decreases, single and double, where you return sts to the left needle such as the KRPS (Knit Return Pass Return on knittinghelp.com. I can't believe my library had this book, which BTW is a reprint from 1972. It's in very good condition, even with the yellowing pages!
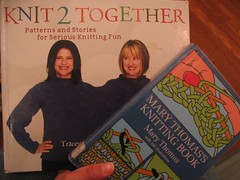
The other book you see in the picture is K2TOGETHER. I've been wanting to borrow this book since Tracey Ullman co-wrote it. There are a couple of lounging/yoga pants in it that piqued my attention.
1 comment:
Hey Jackie, great tutorial. FYI, I have been wanting Mary Thomas's book for forever now and just checked amazon, they have it for $9.95. I think I might get it!
Post a Comment